Home Search

DriveWorks Pro 22
Specification Macros

Send Feedback

Specification Macros

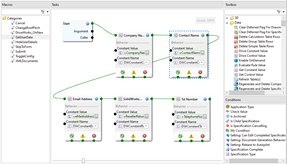
Specification Macros can be applied to Macro Buttons on the user Form or triggered from the Specification Flow, Specification Timers or Drive3D Click Macro Entities to run set Tasks that can have parameters passed into them using Rules or Connections.
Timeout Period

Looping or nested Macros in DriveWorks have an inbuilt timer that will ask the user whether to continue or stop the execution of the Looping Macro after 20 seconds.

Nesting Macros

Macros can be nested (make calls to other Macros from within a Macro). A maximum depth of 200 nested Macros can be included within a single Macro.

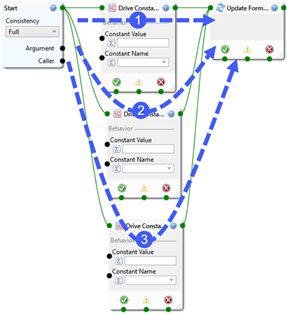
DriveWorks will execute all valid Tasks from the first available route before backtracking and checking for all other valid Tasks.

For Example:

When three Tasks are all connected to the Start Node and all are then connected to a fourth Task, DriveWorks will execute the first and fourth Tasks first (the most direct route) before executing the second to fourth and third to fourth Tasks.
Zoom

The main window can be zoomed in and out by holding the control key on your keyboard, and scroll using the wheel on your mouse.

To reset the zoom to 100% at any time, double click the zoom level box at the top right of the main window.

The zoom level is hidden when at 100%

Add a Specification Macro

To create a Specification Macro:

  1. Open the Project it is to be applied to in DriveWorks Administrator.
  2. Select Specification Macros from the Task Explorer found within Stage 5: Specification Control.
  3. Click Add to add a new Macro.
  4. Enter a name for the Macro.
  5. Click OK.
  6. The Specification Macro Editor will show the new Specification Macro.

Edit a Specification Macro

To edit a Specification Macro:

  1. Click on Specification Macros in the Task Explorer found within Stage 5: Specification Control.
  2. Select the Macro from the Specification Macros tree that you wish to edit.
  3. The Specification Macro Editor will show the selected Specification Macro allowing you to edit that Specification Macro Flow.

Rename

Specification Macros and the Nodes within them can be renamed.

Specification Macro

To rename a Specification Macro:

  1. Click on Specification Macros in the Task Explorer found within Stage 5: Specification Control.
  2. Select the Macro from the Specification Macros tree.
  3. Click the Rename button from the Command Bar.
  4. The Name field of the Macro will become active allowing the Macro to be renamed.
If the name given to a Macro already exists, a warning message will be displayed and the operation will be cancelled once the message is dismissed.

Macro Nodes

To rename a Macro Node:

  1. Select the Macro that contains the Node to be renamed from the Macros list.
  2. Select the Node to be renamed.
  3. Click the Rename button from the Command Bar.

    Or

    Right click and select Rename from the context menu.

  4. The Name field of the Macro will become active allowing the Macro to be renamed.

Delete

Specification Macros and the Nodes within them can be deleted.

Specification Macro

To delete a Specification Macro:

  1. Select the Macro from the Macros list.
  2. Click the Delete button from the Command Bar.

Macro Nodes

To delete a Macro Node:

  1. Select the Macro that contains the Node to be deleted from the Macros list.
  2. Select the Macro Node from the Specification Macro Flow area.
  3. Click the Delete button from the Command Bar.

    Or

    Right click and select Delete from the context menu.

Cut, Copy or Paste

Specification Macros

Specification Macros can be copied and pasted within the same Project or across other Projects.

Macros will be copied along with all Nodes and rules applied to all properties.
  1. Select the Macro to be copied from the Macros list.
  2. Click the Copy button found on the Command Bar.
  3. Click the Paste button from the Command Bar.
The name of a pasted Macro will be suffixed with an incremental number.
Macros can be copied between Projects.

Launch another session of DriveWorks Administrator and have the Source Project open in one, and the destination Project open in the other. Both Groups can be viewed side by side on your screen.

Macro Nodes

Macro Nodes can be copied and pasted within the same Project or across other Projects.

Nodes will be copied along with all rules applied to all properties.
  1. Select the Macro that contains the Node to be copied from the Macros list.
  2. Select the Macro Node from the Specification Macro Flow area.
  3. Click the Copy button found on the Command Bar.

    Or

    Right click on the Node and select Copy.

  4. Click the Paste button from the Command Bar.

    Or

    Right click on the Node and select Paste.

The name of a pasted Node will be suffixed with an incremental number.
Offset Nodes

When a Node or multiple Nodes are pasted they will be offset over the original position.

Nodes can be copied between Projects.

Launch another session of DriveWorks Administrator and have the Source Project open in one, and the destination Project open in the other. Both Groups can be viewed side by side on your screen.

Collapse All, Expand All

When Specifications Macros are placed within Categories (see below) they can be collapsed or expanded by:

  1. Right click anywhere in the Macros list.
  2. Select Collapse All or Expand All from the context menu.

Each Task Node can be collapsed to only show its title and Status Output connections.

  1. Right click on the Node to be collapsed.
  2. Select Collapse.

Once collapsed the Node can be expanded by:

  1. Right click on the Node to be expanded.
  2. Select Expand.

Categories

Specification Macros can be placed within categories.

  1. Click Add Category button from the Command Bar.
  2. Enter a name for the category and click OK.
    The category will be added under the Categories heading in the Macros tree.

Adding Macros to a Category

Macros are added to a category by:

  • Selecting the category and clicking Add to add a new Macro to the category
  • Selecting an existing Macro and dragging it to the required category

Additional Resources

MyDriveWorks - Tech Tips

Macro Buttons

See how a Macro Button's argument and click position can be used as an input. This examples demonstrates a color picker.