Generation Tasks
Generation Tasks allow additional automation Tasks to be run on Parts, Assemblies and Drawings.
Only Queued model generation is supported. Generation Tasks will not work with OnDemand model generation.
Please see Model Generation for more information on the
different model generation types.
Enabling a loop allows the sequence of Tasks to iterate through the Component or Drawing with each iteration
producing unique results. This allows DriveWorks to perform Generative Modeling.
Generation Tasks are run before (Pre Drive) or after (Post Drive) the standard generation sequence.
The standard generation sequence comprises, for example:
- Copying of files
- Replacing of components
- Driving of dimensions
- Changing states of features
- Applying values to Custom Properties
This is essentially the driving of existing Files, Geometry and Meta-Data.
Generation Tasks perform Generative Modeling. This is the ability to add to Models or
Drawings.
This could be, for example:
- Creating Configurations
- Inserting components into an Assembly
- Auto ballooning a Detail View
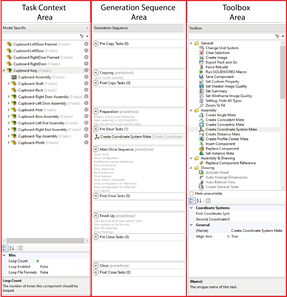
The Generation Tasks editor has three columns:
Status Bar
The Status Bar (bottom left of the main window) displays information on the current selection. This includes:
- The number of tasks the selected component contains
- The number of tasks that are currently selected
Task Context
The Task Context column allows Generation Tasks to be run on individual Models and Drawings or every Model
and Drawing.
By default the column displays the components in Model Specific view.
| Model Specific | Type Specific |
|---|
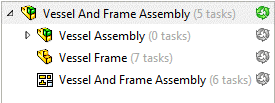 |  |
This view allows Tasks to be run on:
- Individual Assemblies
- Individual Parts
- Individual Drawings
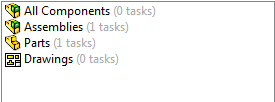
| This view allows Tasks to be run on:
- All Components
- Assemblies
- Parts
- Drawings
|
| A combination of Model Specific and Type Specific Tasks can be applied. Type Specific Tasks will run before Model Specific Tasks. |
Select the Task Context
Switch to Type Specific view by clicking the column heading and selecting Type Specific.
Or
Click the Type Specific button on the Command Bar.
Looping
Looping is available for Model Specific Tasks.
When Models are released with Looped Generation Tasks, a count is created for each loop.
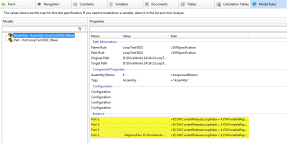
Your Project can keep track of the loop count by applying the Special Variable Current Release Loop Index to your rules.
Looping allows a Task Sequence to be run a set amount of times, with differing property values applied for each loop, without adding the Task over and over again.
For example:
The Insert Component can be looped 10 times, within a sequence, to insert 10 components into an assembly.
Looping will not create multiple components from a single model.
Please see How To: Create Multiple Component Sets From A Single Specification if this is required.
A loop is enabled by setting the Loop Count property to be greater than 1 in the Model Specific properties
window.
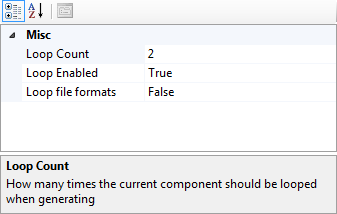
Once a loop is enabled the loop icon next to the model turns green.
Also the Pre Drive Tasks and Post Drive Tasks, in the generation sequence, are enclosed within a box. This
indicates that any Tasks in these areas are contained within each loop.
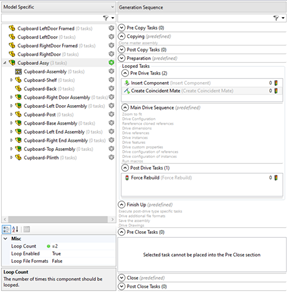
Looping an Assembly where a captured Instance is replaced with a file.
Replace rules on an Instance, in an Assembly, are only performed on the first loop.
All other loops will ignore the replace rule.
Test Mode will display the result of the Replace rule on the first loop.
Generation Sequence
Tasks are added from the Toolbox by selecting a component (Model or Type Specific) from the Task Context Area and:
Once added to a Generation Sequence, Tasks can be reordered by using the Move icons on the Command Bar.
Tasks can be removed or moved to another sequence by right clicking on the Task and selecting the appropriate option from the menu.
There are six areas where Generation Tasks can be added:
Not all Generation Tasks are appropriate for every sequence.
Tasks cannot be added to a sequence that is not suitable.
Once a Task is selected each sequence will indicate if it can be added (if no other Tasks have previously
been added), for example the following message will be displayed on the Generation Sequence:
Selected task cannot be placed into the SEQUENCE NAME section
Pre Copy Tasks
Pre Copy Tasks run before the Copying Sequence (cloning of the required master model).
Tasks added here are typically taken from the File System or Specifications categories of the Toolbox.
Post Copy Tasks
Post Copy Tasks run after Copying but before the Preparation Sequence (retrieving component references and
opening the cloned model in SOLIDWORKS)
Tasks added here are typically taken from the File System or Specifications categories of the Toolbox.
Pre Drive Tasks
Pre Drive Tasks run after the Preparation sequence.
This is after the cloned Model or Drawing has been opened in SOLIDWORKS, but before any driving of captured
parameters has taken place.
Most Tasks are available for adding to this Sequence.
Post Drive Tasks
Post Drive Tasks run after the Main Drive Sequence (driving of all captured parameters).
This is after the cloned Model or Drawing has had its captured parameters driven, but before the Finish up...
sequence takes place.
Most Tasks are available for adding to this Sequence.
Pre Close Tasks
Pre Close Tasks run after the Finish Up sequence (execution of Post Drive Tasks, driving additional file
formats, file saving and driving any required Drawings).
This allows further Tasks to be run while the file is still open, prior to it being closed.
Post Close Tasks
Post Close Tasks run after the Finish Up Sequence (creation of additional file formats, saving, driving of
Drawings).
Most Tasks are available for adding to this Sequence, apart from Tasks that require the file to be open in
SOLIDWORKS.
All Generation Tasks are categorized into the component type they apply to.
General, File System and Specification categories have tasks that can run on any component type.
The Toolbox can be filtered to quickly locate the required Task.
Once a Task is added to a Generation Sequence its properties can be set from the window directly under the Toolbox.
Conditions
Conditions are used to control whether specific Tasks in a Task Sequence are executed.
With the applied Generation Task selected, either:
- Click Edit Conditions on the Command Bar
Or
- Right click and select Edit Conditions from the menu
See Generation Tasks - Condition Editor for more information.
How To Add Generation Tasks
To add a Generation task:
- Select the Task context the Task is to be added to. This can be:
- Model Specific - Used to select an individual Model or Drawing to run the Task(s) on.
- Type Specific - Used to select all Models or Drawings to run the Task(s) on.
- Select the Part, Assembly or Drawing the Task is to be run on.
- Double Click or Drag the Task from the Toolbox to the required Generation Sequence.
- If the Task is to run more than once, set the number in the Loop Count property.
Tasks can be removed by selecting the Task and:
- Clicking Delete on the Command Bar.
- Right click, select Remove.
- Pressing the Delete key on the keyboard.
If more than one Task has been applied all Tasks can be deleted by multi-selecting and using one of the
above methods.
How To Move Tasks
Tasks can be moved from Pre Drive to Post Drive (and Post Drive to Pre Drive) by:
- Select (Ctrl or Shift select for multi selection) the Task(s) to be moved.
- Drag to the required generation sequence or right click and select Move to.
How To Reorder Tasks
The order that Tasks are listed in the Generation Sequence can be reorganized by first selecting the Task you
want to move. Once selected, use the options below in the Command Bar :
- Move Up - Moves selected Task upwards in the list by one place.
- Move Down - Moves selected Task downwards in the list by one place.
- Move To Top - Moves selected Task to the top of its current list.
- Move To Bottom - Moves selected Task to the bottom of its current list.
How To Copy And Paste Tasks
Generation Tasks can be copied and pasted within the same Project or in another Project. To Copy a Task:
- Select the Task you wish to Copy.
- Copy the Task by either:
- Right click and select Copy.
- Click Copy found on the Command Bar.
- Using the keyboard shortcut.
- Browse to the Location you wish to Paste the copied Task.
- Paste the Task by:
- Right click in where you wish to Paste the copied Task and select Paste.
- Click Paste on the Command Bar.
- Use the keyboard shortcut.
How To Cut And Paste Tasks
Generation Tasks can be Cut and Pasted within the same Project or in another Project.To Cut a Task:
- Select the Task you wish to Cut.
- Copy the Task by either:
- Right click and select Cut.
- Click Cut on the Command Bar.
- Using the keyboard shortcut.
- Browse to the Location you wish to Paste the cut Task.
- Paste the Task by:
- Right click in where you wish to Paste the Cut Task and select Paste.
- Click Paste found on the Command Bar.
- Use the keyboard shortcut.
Additional Resources
MyDriveWorks - Tech Tips
Configuration Dims
Use the 'Create Configuration' or 'Switch Configuration' Generation Tasks to control Configuration specific dimensions.
Create Model Image
This Project demonstrates how to create images of generated Assemblies, Parts or Drawings using Generation Tasks.
Dim Inserted Models
Find out how to add dimensions to Drawings that show Assemblies generated using the Insert Component Generation Task.
MyDriveWorks - Tech Tips
Drawing Gen Tasks
Use the 'Auto Arrange Dimensions', 'Auto Balloon View' and 'Rescale And Position View' Generation Tasks to control a driven Drawing.
Drive General Table
Add more detail to your Drawings through the creation and population of General Tables with these Generation Tasks.
Hole Wizard
Hole Wizard Features can be driven in many ways, this Project shows three of these methods: Sketch Dimensions, Advanced Feature Parameters and Generation Tasks.
MyDriveWorks - Tech Tips
Insert and Mate
This Project demonstrates how to insert and mate a component using Generation Tasks and how to use looping to insert multiple components.
Insert Decal on Face
This Project demonstrates how to Insert a Decal onto a part using Generation Tasks.
Insert Library Feature
This Project demonstrates how the 'Insert Library Feature' Generation Task can be applied to your models.
Tech Tips Index
View all available MyDriveWorks Tech Tips.
DriveWorks Tech Tips Index