How To: Use The Macro Argument Property
This example explains how the Macro Argument property can be
used to drive differing values into a single output, as in the
images below.
Image when Macro Button 1 (with the caption Type A in the
image below) is clicked:

Image when Macro Button 2 (with the captionType B in the
image below) is clicked:

Image when Macro Button 3 (with the captionType C in the
image below) is clicked:

The Macro Argument property is a property of the Macro Button and the Run Macro and Run Macro in a Loop tasks.
This article requires DriveWorks Pro Administrator.
Overview
For this example we will use three Macro buttons that, when each
is clicked, will drive a different image into a picture box (the
output).
Each Macro Button will use the same specification macro, only
the macro argument property will differ for each button.
The steps involved to achieve this are as follows:
- Create a constant to drive the image path into.
- Create a specification macro that drives the constant.
- Add the controls to the user form.
- Test
Before you Begin
Prepare the images to be driven into the picture box
control.
Use an image editing application if necessary, but this example
uses the images from the Sample Pictures folder in Windows
7.
Ensure the images follow the guidelines below:
- Each image has the same dimensions (Each of the sample images
in Windows 7 are 1024 x 768).
- Each image is numbered consecutively (1.jpg, 2.jpg, 3.jpg,
etc.).
- The images are stored in a folder relative to the project
location, for this exercise use the sub folder Images, so you have
the location:
<
Drive>\<
ProjectLocation>\Images
Open or create a group and project to start this exercise, at
the location <
Drive>\<
ProjectLocation>
Create a Constant
The constant will store the image path and name and will be
driven by a specification macro (next stage).
- With the Group and Project open in DriveWorks Administrator
select the user form to apply this example to from Stage 3: Data
and Rules> Define Constants.
- From the command bar click Add to insert a new constant.
- Enter a name for the new constant, use
DrivenImageName for this example.
- Click OK to apply the constant.
Create a Specification Macro
The specification macro will drive a value into the
constant created above. The value will be the result of a rule
that forms the location (relative to the project) and the name
of the image. The name will be taken from the macro argument
property of the last macro button to be clicked.
- Select Stage 5: Specification Control> Specification
Macros.
- From the command bar click Add to insert a new specification
macro.
- Enter a name for the macro, use
ChangePicture for this example.
- Click OK to create the macro.
- In the Edit Tasks dialog drag the
Drive Constant Value task from the toolbox into
the Tasks column.
- With the Drive Constant Value task selected click in the
Constant Name behavior property, activate the drop down for this
property and select the constant created above (DWConstant
DrivenImageName).
- Make the Constant Value property dynamic.
See how to
make a static property dynamicTo change a static property to a dynamic property:
- Locate the static property from the list of available
properties.
- Double click the gray radio button
 to the right
of the property name.
to the right
of the property name. - The button will turn green
 indicating
the property is now dynamic.
indicating
the property is now dynamic.
To return the changed dynamic property to a static property:
- Locate the static property in the property grid.
- Double click the green radio button
to the
right of the property name.
- The button will turn grey
indicating
the property is now static.
When returning a changed dynamic property to a static property
any rule applied while it was dynamic will be lost.
The default static property value will be the value the rule
equated to before it was changed.
- Click the Build button to launch the Rule Builder.
- Type the following into the rule editor window:
"Images\" &
This is the
location of the images relative to where the DriveWorks Project is
stored. See
Before you Begin section above.
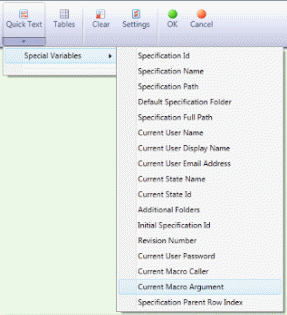
- Ensure the cursor remains after the & symbol in the rule
editor window. Click the arrow under the Quick text button in the
command bar of the rule builder, click Special Variables and select
Current Macro Argument.
- Ensure the cursor remains after the special variable (just
added) in the rule editor window and type the following:
& ".jpg"
This is the file extension of the images to be used. If you
are using your own images replace jpg with the extension of the
images you are using.
The should now look like this:
"Images\" & DWCurrentMacroArgument &
".jpg"
- Click OK to apply the rule.
- Click Finish in the Edit Tasks dialog to apply the changes to
the macro.
Add The Controls
The user form will have three macro buttons that are
required to drive a different image into a single picture box.
- Select the user form to apply this example to from Stage 2:
User Interface> Form Design.
If a new
form is required for this example create one and add it to the Form
Navigation from Stage 2: User Interface> Form Navigation.
- Add a Macro Button to the user form by selecting the More...
button from the command bar and choosing Macro Button from the
Controls dialog.
- Enter a name for the Macro Button, use
TypeA for this example and click OK.
- Add two more Macro Buttons and enter the names
TypeB and
TypeC respectively.
- Add a Picture Box control to the form by selecting the
 icon from the command bar.
 - Enter a name for the Picture Box control, use
DrivenPicture for this example.
- Arrange the Form Controls similar to the layout below:
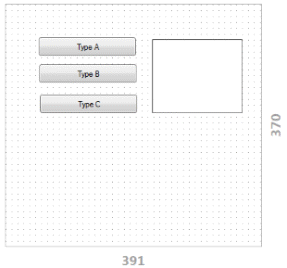
- Multi select all of the Macro buttons, select the Macro Name
property and click the build button to launch the rule
builder.
- Click the Macros... button from the command bar of the rule
builder, select the ChangePicture macro from the Macros dialog and
click OK.
- Click OK in the rule builder to apply the same macro to all of
the macro buttons that were selected.
- Click anywhere on the form to deselect the macro buttons.
- Select the first macro button (
TypeA). Select the Macro Argument property and
enter 1.

We can use the value 1 because the image to use when this button
is clicked is named 1.
If your images are named differently enter the name of the image
required to be displayed when the Type A macro button is
clicked.
Note if the image name is text, quotes "" are
not required.
- Repeat step 12 above for the second macro button (
TypeB) using
2 for the macro argument, and the third macro
button (
TypeC) using
3 for the macro argument.
- Select the Picture Box control (
DrivenPicture), and then select the File Name
property. Click the build button to launch the rule builder.
- In the rule builder select the Constants tab from the right
hand side and double click the constant
DrivenImageName.
- Click OK to apply this rule to the File Name property and close
the rule builder.
Test
Specification Macros cannot be run in the form design test mode.
So you will need to start a new specification to see this example
in action.
Additional Resources
MyDriveWorks - Tech Tips
Macro Buttons
See how a Macro Button's argument and click position can be used as an input. This examples demonstrates a color picker.
Tech Tips Index
View all available MyDriveWorks Tech Tips.
DriveWorks Tech Tips Index
| Knowledge Base Article Ref: | KB12121043 |
|---|

A user form control that, when selected, will run a VBA
macro.