MyDriveWorks - Tech Tips
Using either the .tab file or a .xml file provided in the drivepkg, generate multiple Specifications at once using Autopilot.
DriveWorks Autopilot has the ability to import specifications in XML or Tab delimited format and translate the content into a DriveWorks specification.
This is particularly useful when performing tests on the autopilot function as the xml can contain many specifications for processing at once.
To import a specification file you must have either a XML or Tab delimited text file, correctly formatted (see XML Format and Tab delimited format sections below) that can be imported into DriveWorks Autopilot.


Once imported a specification has all required outputs generated by processing through DriveWorks Autopilot.

The structure of the xml is as follows, :
The file should be saved with the .xml extension
<?xml version="1.0"?>
<Specifications xmlns="http://schemas.driveworks.co.uk/interop/specification/1/0">
    <Specification Project="[Project Name]" Transition="[Name (Not Title) Of Transition]">
        <Input Name="[Control Name]">[The Control Value]</Input>
    </Specification>
</Specifications>
<?xml version="1.0"?>
<Specifications xmlns="http://schemas.driveworks.co.uk/interop/specification/1/0">
    <Specification Project="[Project Name]" SpecificationName="[Specification Name]" Transition="[Name (Not Title) Of Transition]">
        <Input Name="[Control Name]">[The Control Value]</Input>
    </Specification>
</Specifications>
Replace the element [Project Name], in the above xml, with the name of the project in the currently open group the XML specification belongs to.
Replace the element [Specification Name], in the above xml, with the name of the existing specification in the currently open group the XML specification belongs to. (Used to modify existing specifications only)
Replace the element [Name (Not Title) Of Transition], in the above xml, with the name of the transition to apply to the specification; (Finish, ReleaseAutopilot, ReleaseLocal, Save)
Replace the element [Control Name], in the above xml, with the name of a user form control to apply a value to.
Replace the element [The Control Value], in the above xml, with a valid value to apply into the user form control specified by the [Control Name] element.
Multiple user form controls are added by repeating the line
<Input Name="[Control Name]">[The Control Value]</Input>
in between the </Input> and </Specification>tags
Multiple specifications are added by repeating the code
<Specification Project="[Project Name]" Transition="[Name (Not Title) Of Transition]">
<Input Name="[Control Name]">[The Control Value]</Input>
in between the </Specification> and </Specifications> tags
Reserved characters in XML must be replaced with character entities.
Examples of common reserved characters include the symbols &, >, <
When using these characters the character entity must be used:
| Character | Character Entity |
|---|---|
| & (ampersand) | & |
| > (greater than) | > |
| < (less than) | < |
Examples of replacing reserved characters with character entities
| Example | Result |
|---|---|
| ACME & Co. is to be passed into the Control Name Customer | <Input Name="Customer">ACME & Co.</Input> |
For further examples of Character Entities please see w3schools - HTML Characters and Entities.
The structure of the xml is as follows, the file should be saved with the .xml extension:
<Specifications xmlns="http://schemas.driveworks.co.uk/interop/specification/1/0">
    <Specification Project="[Project Name]" Transition="[Name (Not Title) Of Transition]">
        <Input Name="[Control Or Constant Name]">The Control Or Constants Value</Input>

        <ChildSpecification Control="[Control Name]" Project="[Project Name]" Transition="[Name (Not Title) Of Transition]">
            <Input Name="[Control Or Constant Name]">The Control Or Constants Value</Input>
        </ChildSpecification>
    </Specification>
</Specifications>
The use of a Child Specification list in a project introduces tags that identify the project being specified from the child specification list. The tags for the top level project still exist and remain the same as the example above.
Replace the element [Control Name], in the above xml, with the name of the child specification list control name in the currently open group the XML specification belongs to.
Replace the element [Name (Not Title) Of Transition], in the above xml, with the name of the transition to apply to the project being specified at the child level; (Finish, ReleaseAutopilot, ReleaseLocal, Save)
Replace the element [Control Or Constant Name], in the above xml, with the name of a user form control or constant in the child project to apply a value to.
The structure of the tab delimited file is as follows, the file should be saved with the .tab extension:
The first row of the file contains the user form control names and Project headings.
Each subsequent row contains the values to be passed into their corresponding heading names.
Each column heading and specification value is separated by a tab.
Color    Length    BasePlate    Transition        Project
Blue     2778      True         Finish            Canopy
Red      3100      False        ReleaseAutopilot  Canopy
Color    Length    BasePlate    Transition        Project   SpecificationName
Blue     2778      True         Finish            Canopy    Canopy 0028
Red      3100      False        ReleaseAutopilot  Canopy    Canopy 0056
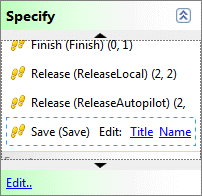
When a Transition is created it is automatically given the same Name and Title.
However the Default Specification Flow caters for releasing a specification locally and to Autopilot.
These transitions have the same Title but are distinguished by their Name (ReleaseLocal) and (ReleaseAutopilot).
The Name of a transition can be identified, from the Specification Flow task and by:

Using either the .tab file or a .xml file provided in the drivepkg, generate multiple Specifications at once using Autopilot.
View all available MyDriveWorks Tech Tips.