Specification Macros Editor
The Specification Macros Editor is where you can create and edit Specification Macro Flows. This is done by adding Nodes. For more information on Nodes see Specification Macro Nodes.
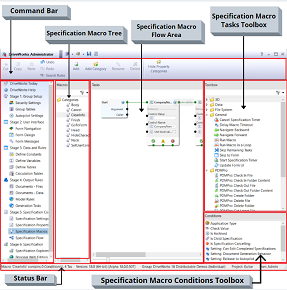
The Specification Macros Editor Pane is divided into five different sections:
- Command Bar
- Specification Macro Tree
- Specification Macro Flow Area
- Specification Task Toolbox
- Specification Conditions Toolbox
Additionally the status bar provides the following information regarding Specification Macros:
- The quantity of Specification Macros that have been created when no Specification Macro is selected.
- The Name and quantity of Conditions, Tasks and Connections when a Specification Macros is selected.
Command Bar
This is where you can add Macros to your Project. It is also contains all the actions such as Rename, Delete and Copy/Cut/Paste that you might want to carry out on a Specification Macro, Task or Condition.
Specification Macro Tree
This is where your added Specification Macros appear. Clicking on each one will show the Tasks and Conditions for that Specification Macro in the Specification Macro Flow Area.
Specification Macro Flow Area
This is where you add Tasks and Conditions to your Specification Macro; You can use multiple Tasks and Conditions to build your own custom Macro flows.
Specification Tasks Toolbox
The Specification Task Toolbox pane shows a searchable list of Tasks that can be added to the Specification Macro Flow Area to become a Task in a Specification Macro Flow.
Specification Conditions Toolbox
The Specification Conditions Toolbox pane shows a list of Conditions that can be added to the Specification Macro Flow Area to become a Condition in Specification Macro Flow.
For more information about the Toolboxes and the Toolbox items see: ToolBox.
How To Add Nodes To The Specification Macro Flow Area
- Drag a Task or Condition into the Specification Macro Flow Area or double click on the Task or Condition to add it from the Toolboxes.
- Set the properties for the Task or the Condition on the Node itself.
For more information on each Node see Specification Macros Nodes.
Multiple Tasks and Conditions can be performed for any single Specification Macro. Repeat the steps above to add multiple Nodes to the Specification Flow Area.
How To Remove Nodes From The Specification Macro Flow Area
- Select the Node to remove.
- Click the Delete button or use Delete on your keyboard. You can also delete the Node through the right click menu.
How To Reorder Nodes In The Specification Macro Flow Area
The order in which multiple Task and Conditions are run, is determined by how the Nodes are connected together using Navigation Connections. The order of the Nodes can be changed by moving them around and reconnecting up the Navigation Connection Points to match the flow you wish to create.
How To Edit Properties For A Node
To edit a Nodes properties click on the Task or Condition and edit the properties you wish to change.
The Title of each Node can be changed to give the Task or Condition a descriptive name. To do this select the Node you wish to rename and click on the Rename button found on the Command Bar.
Each property has an equation icon next to the properties name. Double clicking this allows you to change the property from static to dynamic. Changing the property from static to dynamic allows you to build rules for that property.
To build a static value, type the value into the box next to the property name in the Task Node.
To build a rule, click the property in the Task Node, and then click the ellipsis ... button that appears on the right hand side of the property to launch the Rules Builder.
If you build a rule for a property, then DriveWorks needs to have the Project open to calculate it, which means even if the Specification is going from one Paused State to another, DriveWorks will open the Project and then close it again which may affect the performance of the Project, particularly with Excel Projects.
How To Resize Nodes
To resize a Node click on the Task or Condition and drag the lower right corner of the Node to the desired width.
The height of each Node is automatically set depending on the properties each Node has.
As such only the width of each Node can be changed.
Zoom In or Out of the Work Area
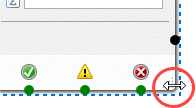
The slider bar at the bottom of the Specification Macro Flow Area controls the scale of the Tasks applied to the macro.
The Work Area can be scaled from 10% to 500% of the original size.
Move the slider to the left to zoom out.
Move the slider to the right to zoom in.
The main window can also be scaled by holding the control key on your keyboard, and scroll using the wheel on your mouse.
To reset the zoom to 100% at any time, double click the zoom level box at the top right of the main window.
The zoom level is hidden when at 100%
When one or more tasks are outside of the visible work area, scroll bars will become active.
The scroll bars allow the horizontal and vertical movement (pan) of the work area.
This can also be achieved by using:
- Horizontal Pan
- Shift + Click Middle Mouse Wheel
Or
- Left and Right Arrow Key
- Vertical Pan
- Ctrl + Click Middle Mouse Wheel
Or
- Up and Down Arrow Key
- Horizontal and Vertical Pan
- Click Middle Mouse Wheel
Or
- Shift + Ctrl + Click Middle Mouse Wheel
Additional Resources
MyDriveWorks - Tech Tips
Macro Buttons
See how a Macro Button's argument and click position can be used as an input. This examples demonstrates a color picker.
Item List
This example demonstrates how to simulate an Item List, using a Simple Table Control and Macro Buttons to give you more control over your user-interface.
Tech Tips Index
View all available MyDriveWorks Tech Tips.
DriveWorks Tech Tips Index